Radon Mitigation Columbus OH
- 616 123 4567
- info@radonmitigationcolumbusoh.com
Radon Mitigation Columbus OH

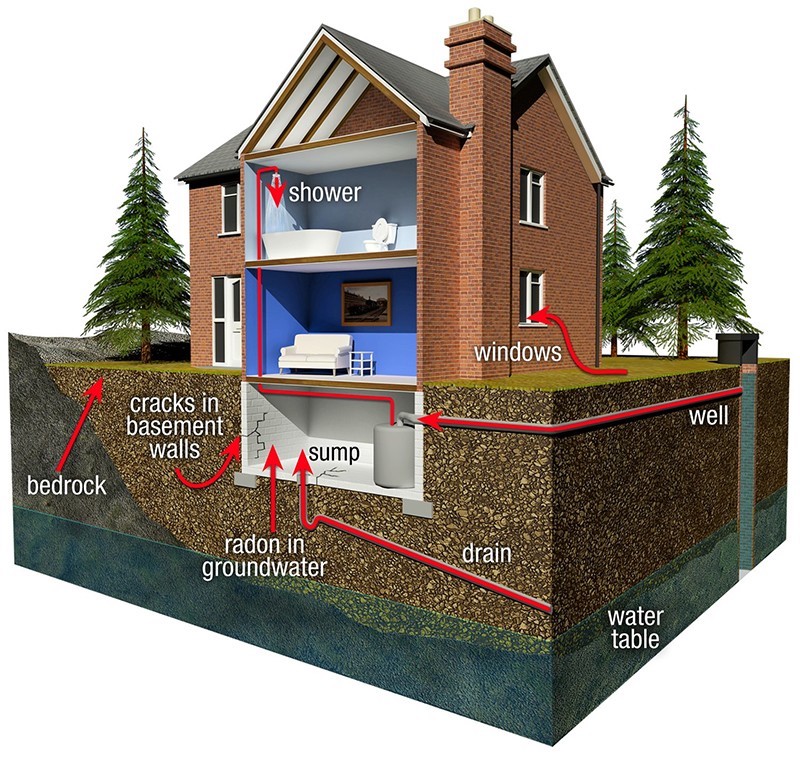
For Columbus homeowners, testing for radon is essential to ensure the safety and well-being of their families. Radon is an invisible, odorless gas that can seep into homes from the ground, posing significant health risks, including lung cancer.
Regular testing allows homeowners to detect and address elevated radon levels promptly, reducing potential health hazards.
By working with RMCO we can create a healthier living environment and work together with you to protect loved ones from the dangers of radon exposure.
I had my home tested for radon using Radon testing, and the process was seamless from start to finish. The technician was punctual and conducted the test efficiently without disrupting my day. They used high-precision equipment and took the time to explain the importance of radon testing and potential health risks. The results were provided promptly, and thankfully, my radon levels were safe. The entire experience was stress-free, and I now feel much more informed about the safety of my home. I highly recommend Reson testing for anyone needing reliable radon testing services.
The EPA recommends that all homeowners conduct an initial radon test to establish the radon levels in their homes. This is crucial because radon is an invisible and odorless gas that can seep into homes undetected. Performing an initial test provides a baseline measurement and helps determine if further action is needed to mitigate high radon levels.
If the initial test shows radon levels at or above 4.0 pCi/L, the EPA advises conducting a follow-up test to confirm the results. This can be a short-term test for a quick reassessment or a long-term test for a more accurate representation of average radon levels over time. Confirming elevated radon levels ensures that appropriate mitigation measures can be taken to reduce the risk of lung cancer.
The EPA recommends retesting your home for radon every two years or after significant renovations or changes to the home’s structure. Additionally, testing should be repeated if you move to a new home or after any major seismic activity. Regular testing ensures that any changes in radon levels are detected promptly, allowing homeowners to maintain a safe and healthy living environment.
Cost-Effective: DIY radon testing kits are generally more affordable compared to hiring a professional service. They offer a budget-friendly option for homeowners wanting to test their radon levels.
Convenience: These kits are widely available and can be purchased from hardware stores, online retailers, or even local health departments. They allow you to test at your own convenience without scheduling an appointment.
Ease of Use: Most DIY radon testing kits come with clear instructions, making them user-friendly. The process typically involves placing the detector in the lowest living area of your home for a specified period and then sending it to a lab for analysis.
Privacy: DIY kits allow you to test for radon without needing to have a stranger in your home. This can be particularly appealing for those who prefer to handle home maintenance tasks independently.
Quick Results: Short-term DIY radon tests can provide results in as little as 2-7 days, allowing you to quickly determine if there is a radon issue in your home.
Accuracy: DIY radon tests may not be as accurate as professional tests due to potential user error in setup, placement, or timing. This can lead to unreliable results, either underestimating or overestimating radon levels.
No Professional Guidance: Without a professional to explain the results and provide recommendations, interpreting the test outcomes can be challenging. Homeowners might not know the best steps to take if high radon levels are detected.
Limited Testing Scope: DIY kits typically test for radon in one specific area of the home. Radon levels can vary throughout a house, so a single test might not give a complete picture of the radon exposure risk.
Need for Follow-Up: If a DIY test indicates high radon levels, a follow-up test or professional evaluation might still be necessary, which can lead to additional time and expense.
Potential Delays: Sending the test back to a lab and waiting for results can take time. Any delays in mailing or processing can extend the period of uncertainty regarding radon levels in your home.
Overall, while DIY radon testing kits offer a convenient and cost-effective initial screening, they might lack the accuracy and comprehensive assessment provided by professional testing services.
Accuracy: Professional radon testing services typically provide more accurate and reliable results due to the use of high-quality equipment and standardized procedures. Technicians are trained to minimize errors and ensure precise measurements.
Expert Interpretation: Professionals can interpret the test results accurately and provide detailed explanations. They can also offer specific recommendations for mitigation if high radon levels are detected, guiding homeowners through the next steps.
Comprehensive Testing: Professionals can perform thorough testing, often taking multiple readings in different areas of the home. This ensures a more comprehensive assessment of radon levels throughout the entire house.
Follow-Up Services: Many professional testing services include follow-up testing and monitoring to ensure that radon levels remain safe after mitigation efforts. This ongoing support provides added peace of mind for homeowners.
Convenience: Hiring a professional means the entire testing process is handled for you, from setup to final results. This eliminates the need for homeowners to worry about proper placement and timing of test devices.
Compliance and Documentation: Professional testing services often provide documentation that can be useful for real estate transactions or compliance with local regulations. This official report can be valuable when selling a home or meeting legal requirements.
Cost: Professional radon testing is generally more expensive than DIY kits. The cost can vary depending on the size of the home and the extent of testing required, making it a less budget-friendly option for some homeowners.
Scheduling: Homeowners need to schedule an appointment for the testing, which might not always align with their convenience. Coordinating a suitable time for both the homeowner and the technician can sometimes be challenging.
Intrusiveness: Having a professional come into your home to conduct the test might be seen as intrusive by some homeowners, particularly those who value their privacy or have concerns about allowing strangers into their home.
Potential Delays: Depending on the availability of the testing service, there could be a waiting period before the test can be conducted. This could delay obtaining radon level information, especially if immediate results are needed.
Variable Quality: The quality of professional radon testing services can vary. It is important to choose a reputable and certified provider to ensure reliable results. Not all professionals have the same level of expertise or equipment quality.
Overall, professional radon testing services offer a high level of accuracy, expert guidance, and comprehensive assessment, but they come at a higher cost and require coordination for scheduling.
Radon Testing Reviews
I recently had my home tested for radon by a professional service, and I couldn’t be happier with the experience. The technician was knowledgeable and explained the entire process in detail before starting. They used state-of-the-art equipment and took multiple readings in different areas of my home. The results were provided quickly, and the technician offered recommendations for mitigation since my levels were slightly above the EPA’s action level. The peace of mind that comes from knowing the radon levels in my home is invaluable. Highly recommend this service for anyone concerned about radon exposure.
Sarah H.
I had my home tested for radon using Reson testing, and the process was seamless from start to finish. The technician was punctual and conducted the test efficiently without disrupting my day. They used high-precision equipment and took the time to explain the importance of radon testing and potential health risks. The results were provided promptly, and thankfully, my radon levels were safe. The entire experience was stress-free, and I now feel much more informed about the safety of my home. I highly recommend Reson testing for anyone needing reliable radon testing services.
Tony
I opted for a DIY radon testing kit and found it to be incredibly easy to use. The kit came with clear instructions, and setting it up was straightforward. After leaving the test in place for the recommended time, I mailed it back to the lab. The results arrived via email within a week. Fortunately, my radon levels were within the safe range, but if they hadn’t been, the kit included information on what steps to take next. For anyone looking to test their home for radon without breaking the bank, this is a great option.
Mike
Follow the instructions provided with the test kit carefully. Leave the test kit undisturbed for the recommended duration, typically between 48 hours and 7 days.
Ensure that no fans, air purifiers, or other devices that could alter air circulation are running near the test kit. After the testing period, promptly seal the test kit and send it to a certified laboratory for analysis.
Review the results and, if necessary, take appropriate radon mitigation steps based on the findings.
Short-Term Radon Tests
• Duration: 2-90 days
• Types: Charcoal canisters, alpha-track detectors, electret ion chambers
• Best practices for short-term testing
Long-Term Radon Tests
• Duration: Over 90 days
•Types: Alpha-track detectors, electret ion detectors
– Benefits of long-term testing
Radon levels in the air are measured in units called picocuries per liter of air, abbreviated as pCi/L. Understanding these units is essential for evaluating radon levels in your home and determining the necessary steps for mitigation.
A picocurie is a unit of radioactivity. Specifically, one picocurie represents one trillionth (0.000000000001) of a curie, a standard unit for measuring radioactive decay. In terms of radon gas, it indicates the rate at which radon atoms decay and release radiation.
Measuring radon levels in picocuries per liter (pCi/L) of air provides a standard way to assess the concentration of radon in your environment. The Environmental Protection Agency (EPA) has established guidelines based on pCi/L measurements to help homeowners understand the risk levels and take appropriate action.
Regular radon testing is crucial as radon levels can vary significantly from one home to another and even within different areas of the same home. Testing provides accurate measurements, enabling you to make informed decisions about necessary mitigation efforts.
By understanding radon measurement units and their implications, you can take proactive steps to ensure a healthier living environment for you and your family.promptly, and thankfully, my radon levels were safe. The entire experience was stress-free, and I now feel much more informed about the safety of my home. I highly recommend Reson testing for anyone needing reliable radon testing services.
By following these steps with RMCO, you can ensure accurate radon testing and take the necessary measures to protect your home from radon exposure
Delivery: RMCO will deliver the appropriate radon test kit to your home. The kit includes detailed instructions, a radon detector, and a return envelope.
Retest: After mitigation, conduct a follow-up radon test to confirm that radon levels have been successfully reduced.
For more information or to schedule a test, contact Radon Mitigation Columbus Ohio today.
Accurate radon testing requires careful placement of the testing devices. Follow these guidelines to ensure the best results:
Lowest Livable Area: Place the testing device in the lowest level of your home that is regularly used, such as a basement, ground floor, or living area.
Breathing Zone: Position the device at a height where it will most accurately represent the air you breathe, typically 20 inches to 6 feet above the floor.
Center of the Room: Place the device at least 3 feet away from exterior walls, 1 foot away from interior walls, and 20 inches from the floor. Avoid placing it in corners, near windows, or other areas with poor air circulation.
High Humidity Areas: Avoid kitchens, bathrooms, laundry rooms, or any area with high humidity or steam, as moisture can affect the test results.
Drafty Areas: Stay away from areas with strong drafts, such as near windows, doors, ventilation ducts, or fans. These areas can alter radon levels and lead to inaccurate readings.
Heat Sources: Keep the device away from heat sources like stoves, fireplaces, or heating vents, which can affect the airflow and skew the test results.
Areas of Direct Sunlight: Do not place the device in direct sunlight, as the heat can interfere with the test.
Keep Windows and Doors Closed: Ensure all windows and doors remain closed for at least 12 hours before and during the test, except for normal entry and exit.
Undisturbed Location: Place the device in an area where it won’t be disturbed by pets, children, or regular household activities.
Follow Manufacturer Instructions: Always follow the specific instructions provided with your radon test kit for the best results.
By adhering to these guidelines, you can ensure accurate and reliable radon test results, helping you make informed decisions about the safety of your home. If you have any questions or need assistance, contact Radon Mitigation Columbus Ohio for expert advice and support.
During the winter months, radon levels tend to be higher. The primary reasons for this increase include:
Spring and fall often show moderate radon levels due to:
Summer generally brings lower radon levels because:
In Columbus, Ohio, weather patterns can significantly influence radon levels. Some key factors include:
measures can be taken to reduce the risk of lung cancer.
For the most accurate radon testing results in central Ohio, consider the following guidelines:
Understanding the seasonal variations in radon levels and how weather affects these fluctuations is crucial for effective radon testing and mitigation in Columbus, Ohio. Winter typically presents the highest radon levels, making it a critical time for testing. However, long-term tests provide the most accurate representation of annual radon exposure. By considering these factors and testing at the appropriate times, homeowners can ensure a safer living environment and take necessary actions to mitigate radon risks. For expert advice and testing services, contact Radon Mitigation Columbus Ohio (RMCO) to protect your home and health.